Wednesday, September 25, 2013

an easy way to get your pinterest pin count

According to my blog stats, Pinterest is my #1 traffic source. But I wanted to know myself, What are people loving so much? If I know what you love, I can see what I did, and continue doing it to make your reading experience enjoyable.

Imagine my delight to see Pinterest has a plugin for getting your pin count on individual blog posts. Say what?! I have always gone the long method of inputting the "pinterest.com/source" way of getting every single pin and counting each one up to see how many times something had been pinned. Call me impatient, but I just want to know now, quickly how effective Pinterest is for my blogging. I mean, I put A LOT of time into creating pin-able images, I want to know in a snap if it's time well spent. 

Not to mention, people don't always pin the pin-able image I create. They might like another image better. It's their Pinterest, they're going to pin in a way that's convenient for them. I don't want it to appear I'm being shorted pins when I'm trying to determine my data and proper networking.

It only took one Google search to see there is a plugin  for that. It's so incredibly easy to use too. It gives you an exact number of how many times an exact URL has been pinned.

FIRST: Go to the Plugin site


There you are. NOW: enter the URL you are inquiring about. According to my blog stats, How to Clean Mildewy Towels is my most viewed post, so I put the URL for that in. You can see immediately it has 184 pins.


Do take note, Pinterest says they treat each URL separately. In my case, I had the newlymynted.blogspot.com URL when I first created this blog post. It was shortly after I shared it that I bought my own URL. So I simply added the .blogspot to the URL I entered, and can see there were 29 pins before I changed my site URL.

In total, this makes my pin count on this post 213. That's it. That's what I wanted to know. And real quick! Thank you, Pinterest!

I hope this is helpful to you. And thank you to all of those that have viewed and pinned this. As a new blog, it warms my heart to see so many pins. Thanks for letting me know my time has certainly been spent well. I'm also thankful there are other people besides me who have mildewy towels and are searching for ways to get them clean!

Happy pinning!
Steph
Facebook        Twitter        Pinterest         Instagram        Email

Tuesday, September 24, 2013

Cooking tip: DIY disposable grease traps


When it comes to being a mom blogger who cooks, I'm the first to admit I'm no Pioneer Woman. I can make a mean batch of mustard greens, but I'm still an easy-recipe, no mess no fuss kind of cook. I do, however, have a few tricks up my ... apron sleeve? No, I don't own an apron. Oven mit! Yes. I have a few tricks up my oven mitts. One of them is disposable grease traps. I've tried many techniques for draining grease from beef and other meats, but this method is hands down the most practical and clean. Logan caught onto me doing this and now does it himself. 

When you drain your meat, line a cereal bowl with aluminum foil. Drain into the bowl. Let it set on the counter or in the fridge until it solidifies, then wrap it up and toss it out. Easy as that! 

This is something I've been doing for years now and it's full proof. My sink doesn't get greasy and I don't risk clogging my drains.

Happy cooking!
Steph
Facebook        Twitter        Pinterest         Instagram        Email

Monday, September 23, 2013

Sewing 101: Sewing Machine Presser Feet Guide


There's nothing I love more than gathering sewing finds while thrifting. I've been fortunate enough to score not only an antique Singer sewing machine, but loads of presser feet and other sewing accessories. Presser feet can be expensive, depending on the attachment. As a seamstress of meager means, such prices are not always in my budget. So it brings me a lot of joy when I find them in bulk for just a few dollars. But what do all those sewing feet do?

PART ONE: SEWING MACHINE PRESSER ATTACHMENTS -- WHAT THEY ARE AND HOW THEY WORK


A standard presser foot (aka a universal presser foot) does all you basic stitches, straight and zigzag, and has a hole wide enough to adjust to your widest stitch settings.
An adjustable zipper foot is what is used to attach a zipper with ease. Yes, there's an easy way to do this! Slide the foot until your sewing needle fits in either slot, left or right side (depending on which side of the zipper you're on). It guides the needle right along the edge of your zipper. This foot is also known as a cording foot, as it can be used to make piping. I will soon be doing this for a chair I plan on reupholstering, so I will show a tutorial on making piping once it's done.
This is used to help attach binding to your fabric. It will thread through the cylinder shape piece, stitching it perfectly in place. This little foot is marvelous because that small cylinder keeps your binding set in place and you don't have to struggle to hold it aligned while you sew.
This particular foot often causes quite the debacle. There is always the war between gathering foot vs ruffler. It gathers fabric, creating very soft ruffles. I personally think this foot is best served for shirring.
I love this foot! Honestly, I would make a necklace out of it and carry it around with me. It does as it says, stitches along the edge of the fabric. It's great for those hem's with a close stitched edge. It can also sew lace to the edge of fabric beautifully. It's perfect for attaching ric rac. Even better, it can sew two pieces of fabric together, you can sew two pieces of lace together, attach piping, or use it for bias folds. Those few little grooves can do sew much, it's marvelous!
The creme de la creme of attachments, the ruffler is one of my favorites. It creates perfectly pleated ruffles, large and small. It's actually quite amazing to watch. It's a bit tricky to use, but once you get it, it's like magic! It honestly does not compare with the gathering foot, that's why I say that attachment is best used for shirring. A ruffler is more expensive, but you wouldn't regret the purchase. I promise! I am going to be working on some pillow cases and thought of sharing a video tutorial on using one, any interest?
The hinged presser foot is commonly used for sewing over seams and uneven surfaces. It's not for reverse sewing.
Another attachment gem, the tuckmarker creates tucks and pleats up to 1" wide without having to tack them. Check out this pleated pillow and you'll see what I mean, this is what it does.
The hemmer sews very narrow seams. Kind of how the edge stitcher works, but its sole purpose is to sew very close to an edge. The edge stitcher can sew two pieces together, this just sews hems small and easy. The groove on the back of your foot will determine how wide the hem will be.
A step up from a standard hemmer, the adjustable hemmer is your better bet. It makes hems ranging from 3/16" to 1". Just loosen the thumb screw and slide it left or right until you reach the desired width of your hem.

These tools can be truly amazing, making any sewing job easy. I cannot wait to show you guys some tutorials using them, that ruffler especially. I hope this info was helpful to you. Now, the next time you're out at the thrift stores, be on the lookout for these sewing accessories. I will keep my eyes peeled too, and when I come across more, we'll do part two of sewing attachments.

Happy sewing!
Steph
Facebook        Twitter        Pinterest         Instagram        Email
Sharing with:

Monday, September 16, 2013

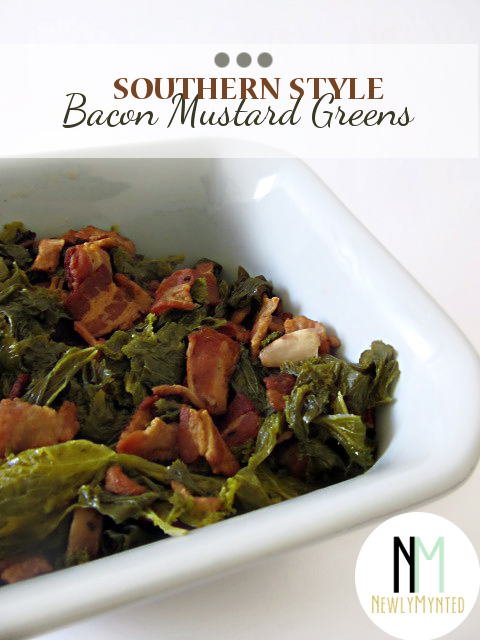
Easy Southern Style Bacon Mustard Greens

Little by little I am learning the vast differences between city life and southern life. It seems greens are a staple food here in the south. I can't recall ever having had them in my life until recently. They are one of Logan's favorite foods.

I found myself scratching my head for a moment there, because I tried to make collard greens once and they were very tough, hardly chewable. For this, I went to his mother, a woman who grew up in a vegetable garden. She instructed me on the importance of the prep work involved in cooking mustard greens or collard greens just right. I quickly discovered I prefer mustard greens to collards because they have a spice to them, a flavor I enjoy. From there it was a matter of making the recipe my own. I know enough about cooking to know it's a matter of the palette and combining foods and spices that complement each other. And boy did it work! To quote Logan, "Don't ever tell my mother this, but I think yours are better." Even Regina thought so. She has now appointed me the mustard greens maker. What a compliment! Here is the Super Simple Bacon Mustard Greens Recipe (with nutritional info). Because I am a firm believer that everything is better with bacon.

Serves: 2
Prep: About 1 hr
Cook time: 40 min

Ingredients:
1 bundle (6-7 cups leaves) mustard greens (DO NOT buy the chopped pre-packaged bags of mustard or collard greens. Ever.)
10 slices bacon, chopped
4 garlic cloves, minced
2 mushrooms, diced

Prep Work:
Prepping your greens is the most important thing to getting them to cook just right. When you don't prep them properly, this is when they become tough and gritty to eat.

Fill your sink with cold water. Place your mustard greens in the sink and begin de-veining them. De-vein each leaf by pulling the leaves off of the center stem. The stem is what causes the toughness when you bite it, so remove it. This is also why I say not to buy the pre-packaged greens. They come chopped, so you have to de-vein each teeny tiny chopped leaf. Discard each stem and store your leaves in a large bowl.

Notice your sink water is most likely now brown and contains a lot of dirt. Drain it and refill it with cold water. Add the leaves back to the sink and agitate consistently for 2-3 minutes. Remove leaves and drain dirty water. Repeat this process until your sink water remains clear. It took me about three washing's. Mustard greens have very curly leaves which cause a lot of dirt to embed in them.

Now on to my award-winning recipe!

Cooking:
Saute bacon, garlic and mushrooms together in a large stock pot; drain any grease from the bacon. Fill pot with 1" of water and bring to a rapid boil. Return bacon to the pot, along with the greens. Reduce heat to medium-low, cover, and cook for 30 minutes. The greens will shrink down considerably.

Serves two as a main dish (Logan loves it all on its own) or four as a side dish with some stuffed pork chops.

I've also included the nutritional info for this recipe. As you can see, it is high in protein and low in calories. A great good-for-you meal!


Let me know in the comments below if you try this recipe. I'd love to hear your thoughts.

XO,
Steph
Facebook        Twitter        Pinterest         Instagram        Email
Sharing with:
Craft-O-Maniac // Homemaker On A Dime // SewCanDo

Friday, September 13, 2013

New logo


I am just tickled to death! NewlyMynted got a new logo. Margo of Eyes of Style has been working on a custom logo for me of late. I was fortunate enough to win her giveaway over at Julie Ann Art blog. She has been such a doll to work with. I more or less knew what I wanted, but I am not good enough at graphic design to really execute it in a professional manner. No logo is better than a bad logo. Margo took what I expressed and ran with it! 

I'm really hoping to open the new shop in the near future, and it needed a happy, sparkly logo to really represent it. I also needed one for the blog. NewlyMynted is all about discovering the new, best you that you can possibly be. Now I have that engraved with some glittery goodness!

Thank you, Margo, for really understanding my direction. You are such a sweetheart!

XO,
Steph
Facebook        Twitter        Pinterest         Instagram        Email

Tuesday, September 3, 2013

Overcoming Divorce


How do you get over divorce?

I don't believe you really "get over" divorce. Like everything in life, time heals and you begin to move on. You learn how to build yourself anew. That has been the past year of my life: building it new -- but only with God's love and grace.


It was one year ago when I saw my father for the first time in a good number of years. Life had been unkind and taken its toll on my body. I was newly separated, depressed, and severely underweight. I couldn't stop getting sick, and I was growing weary of it, physically, mentally and emotionally. I was caring for three children on my own, all who didn't understand. They acted out, I banished myself to another room to release tears that were impossible to hold back. I smoked a pack a day to check out, kill time. Self-destruction held no regard. I later learned that after my brief visit with my dad, he called my mother and wept on the phone to her. The sight of how frail and sunken I was broke his heart.

People often made remarks about a what a strong person I was, saying I was a better woman than they, and so forth, although I didn't feel it most times. People asked how I did it, and always my answer was the same: 

By the grace of God. 

The fact was, I could not do it on my own. On my own, I crumbled. I grew bitter. Resentful. Hateful and angry. My sole desire was to curl into a ball and pray life would stop existing. But God was so kind to me. He took pity on me. He allowed my world to crumble beneath my feet so that I may be brought to my knees and be humbled.


It has been a heart-wrenching year. It has been a happy year. It has been a year full of trials and tribulations. It has been a year in which I learned how wicked and deceitful my own heart could be. It has been a year in which I realized how meek and humble it ought to be. 

I have learned to love and forgive. I have learned to stand on my own two feet. I have learned to praise God for all that I hold dear. For His grace is sufficient!

One year ago August 29, I loaded what I could of my belongings into a 5x8 trailer, hitched to the back of my SUV, and departed Colorado. In the pitch black of early morning, I watched my home vanish from sight through the rear view mirror. Let me tell you, this is why I say you never really "get over" divorce. I had a month to pack and cope and come to terms with everything. But with each passing mile, I got angrier and angrier. I grew more terrified. How was I going to make it on my own? How was I going to provide for three children by myself? Could I survive? I doubted whether or not God's grace was sufficient. I held onto this doubt for many months, and, once again, in December of last year, God let it all blow up in my face, brought me to my knees, yet again, and showed me, Yes, His Grace is Sufficient!

I cannot say exactly what brought me to North Carolina, other than faith. Faith that I was not strong enough to do everything on my own. Faith that God would carry the burden for me. Faith that I was hearing God right when He told me to pack up my children (a second time in so many months) and move them somewhere we've never been. But here we are, nestled deep in the mountains, and we're loving it! God knew this was where we needed to be. He knew this place would bring us peace and joy. He knew I would be able to provide for my kids. And He knew the people who already lived here, whose lives I would come to affect. It's amazing how God knows all our lives, all our circumstances, and can bring us together to change each others lives for the good.

It is with a tearful smile I can say I've gained over 15 pounds back, I rarely get sick, I stopped smoking, for their is no need for me to check out anymore, and I am happy. I can also proudly say that recently I updated my Facebook profile photo and received a delighted call from my dad how good I was looking these days.


So for those who may wonder "How Do You Get Over Divorce?" My answer is, you don't. You get through it. One day at a time, with each breath, clinging to the grace of God for dear life.

All my love today!
Steph
Facebook        Twitter        Pinterest         Instagram        Email
 photo LINKUPBUTTON.jpg