Showing posts with label Recipes. Show all posts

Monday, March 17, 2014

How to Get Summer Ready Skin + Exfoliating Scrub Recipe

Summer is approaching! Did you hear me right? Summer is almost here! Never you mind these intermittent days of snow. We shall merely pretend they don't exist. I can feel the sun right on the cusp of warming my skin each and every day. 

Now that I'm finally in a place where I can get my health under control, and set some goals for myself, I'm adding to the list my super soft skin. Once upon a time I had the softest, shimmeriest (is that a word?) skin. It was perfectly tanned, had a slight glimmer, and I never had to wear foundation. Oh how I miss this! So I've stocked up on the essentials I once used for my own daily DIY exfoliation treatments, and would love to invite you lovelies to have this same delectable skin. It's so easy, too. Just a few all-natural ingredients from the supermarket.

WHAT YOU NEED
  1. Loofah
  2. Pumice stone
  3. Body wash/cleanser
  4. DIY Exfoliating scrub
  5. Moisturizing lotion (low alcohol content)

GET DOWN TO WORK
  1. Use your loofah or a dry cloth to remove any dead skin cells and to open up your pores, before you get in the shower.
  2. Starting from the feet and moving up, toward your heart, begin scrubbing your body with your cleanser.  By going upward in a circular motion, you will increase your body's circulation. Be gentle on sensitive areas such as your face and bikini line. 
  3. Use your pumice stone to remove any dry or cracked calluses on your feet.
  4. Give your body a good once-over with your homemade exfoliating salt scrub.  I'll include my quick and easy recipe at the end of the this post. Rinse well.
  5. Once you're out of the shower, towel dry, leaving your skin somewhat damp. Apply a moisturizer all over your freshly exfoliated skin. Give the lotion a minute to dry and really soak into your skin before getting dressed. You don't want your garments absorbing most of the moisture. My favorite moisturizing lotion is Eucerin healing cream. But whatever you're using, be sure one of the first few ingredients is not alcohol. Many scented or otherwise inexpensive lotions contain a lot of alcohol, which dries out your skin. Once my tan has started to set, I love to use Jergens Natural Glow to slowly build upon it.
NOTE: Don't exfoliate on freshly waxed or shaved skin, or on skin that is sunburned or has any open wounds. This can be very painful and will most likely burn. Believe me, learned that the hard way!

DIY SALT SCRUB RECIPE 
  • 1 cup almond oil
  • 1 cup course sea salt
  • 10-12 drops of vanilla scented oil (or preference)
  • Mason jar or other container with lid

Mix all ingredients into your chosen container. You can use more and fewer drops of your scented oil, depending on how strong you prefer your scent to be. Each time you use your homemade salt scrub, shake or mix it well first.
Thanks for reading!
Steph
Sharing with:
Craft-O-Maniac || The Girl Creative || C.R.A.F.T. || Still Being Molly || New Nostalgia || Ladybug Blessings || Sugar Bee Crafts || Tip Junkie || Seven Thirty Three || Sew Much Ado || Someday Crafts || Not Just a Housewife || Free Pretty Things For You || Chic On A Shoestring Budget || The Shabby Nest || Peek-a-boo || Be-You-Tiful Party || Glitter Glue & Paint || The Sits Girls || Tatertots & Jello ||
The 36th Avenue

Monday, September 16, 2013

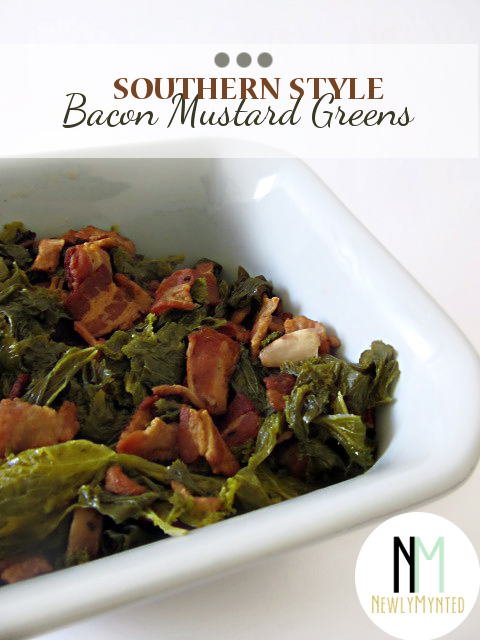
Easy Southern Style Bacon Mustard Greens

Little by little I am learning the vast differences between city life and southern life. It seems greens are a staple food here in the south. I can't recall ever having had them in my life until recently. They are one of Logan's favorite foods.

I found myself scratching my head for a moment there, because I tried to make collard greens once and they were very tough, hardly chewable. For this, I went to his mother, a woman who grew up in a vegetable garden. She instructed me on the importance of the prep work involved in cooking mustard greens or collard greens just right. I quickly discovered I prefer mustard greens to collards because they have a spice to them, a flavor I enjoy. From there it was a matter of making the recipe my own. I know enough about cooking to know it's a matter of the palette and combining foods and spices that complement each other. And boy did it work! To quote Logan, "Don't ever tell my mother this, but I think yours are better." Even Regina thought so. She has now appointed me the mustard greens maker. What a compliment! Here is the Super Simple Bacon Mustard Greens Recipe (with nutritional info). Because I am a firm believer that everything is better with bacon.

Serves: 2
Prep: About 1 hr
Cook time: 40 min

Ingredients:
1 bundle (6-7 cups leaves) mustard greens (DO NOT buy the chopped pre-packaged bags of mustard or collard greens. Ever.)
10 slices bacon, chopped
4 garlic cloves, minced
2 mushrooms, diced

Prep Work:
Prepping your greens is the most important thing to getting them to cook just right. When you don't prep them properly, this is when they become tough and gritty to eat.

Fill your sink with cold water. Place your mustard greens in the sink and begin de-veining them. De-vein each leaf by pulling the leaves off of the center stem. The stem is what causes the toughness when you bite it, so remove it. This is also why I say not to buy the pre-packaged greens. They come chopped, so you have to de-vein each teeny tiny chopped leaf. Discard each stem and store your leaves in a large bowl.

Notice your sink water is most likely now brown and contains a lot of dirt. Drain it and refill it with cold water. Add the leaves back to the sink and agitate consistently for 2-3 minutes. Remove leaves and drain dirty water. Repeat this process until your sink water remains clear. It took me about three washing's. Mustard greens have very curly leaves which cause a lot of dirt to embed in them.

Now on to my award-winning recipe!

Cooking:
Saute bacon, garlic and mushrooms together in a large stock pot; drain any grease from the bacon. Fill pot with 1" of water and bring to a rapid boil. Return bacon to the pot, along with the greens. Reduce heat to medium-low, cover, and cook for 30 minutes. The greens will shrink down considerably.

Serves two as a main dish (Logan loves it all on its own) or four as a side dish with some stuffed pork chops.

I've also included the nutritional info for this recipe. As you can see, it is high in protein and low in calories. A great good-for-you meal!


Let me know in the comments below if you try this recipe. I'd love to hear your thoughts.

XO,
Steph
Facebook        Twitter        Pinterest         Instagram        Email
Sharing with:
Craft-O-Maniac // Homemaker On A Dime // SewCanDo

Wednesday, May 15, 2013

Caramel Apple Banana Bundt Cake

The other day I needed to come up with a dessert for my kiddos. Now, without sounding boastful, I ought to tell you, I am well known for my banana bread and my coffee cake. And on this day I had a bunch of ripe bananas, as well as a can of caramel apple pie filling. I decided to try an alternative to my banana bread recipe, making a scrumptious cake instead. My kids love it!

Ingredients:

Cake:
1 1/2 C flour
1 tsp baking soda
1/2 tsp salt
3 eggs
1/2 C sugar
1 1/2 C banana, mashed
1/2 C caramel apple pie filling (reserve 1 tsp caramel sauce)
2 Tbsp sour cream
1 lemon, juiced

Icing:
1 C powdered sugar
1/2 tsp vanilla extract
2 Tbsp milk
1/8 tsp lemon juice
1 tsp caramel sauce (from can)


Instructions:

1: Preheat oven to 350°.

2: Coat your bundt pan in shortening and flour; set aside.

3: In a medium bowl combine flour, baking soda, and salt; set aside.

4: In a large bowl, whisk together egg and sugar until well blended. Fold in bananas, pie filling, and sour cream gently. Juice lemon into bowl.

5: Add the flour mixture to the banana cake bowl a little at a time, stirring with each addition until everything is thoroughly combined.

6: Poor the cake mix into the bundt pan; bake 50-60 minutes until toothpick inserted comes out clean.

7: Let the cake stand for up to five minutes, then remove it from the pan, transfering to a cooling rack. Cool cake completely.

8: In a small bowl, mix together all ingredients for the icing and drizzle lightly over cake.


***Tips & tricks***
Freeze bananas a day or two before using, then pull them out the morning of baking. They will be the ripest and most delicious.
When juicing lemons, use your hand as a sieve  Cut the lemon in half and hold it right-side-up in your palm. This will allow your hand to catch any seeds that may squeeze out. You also get the most juice with this grip.

Love dearly,
Steph
Facebook        Twitter        Pinterest         Instagram        Email
#banana bread #banana bread alternative #uses for pie filling