Showing posts with label Home. Show all posts

Thursday, February 6, 2014

How to Keep Your Kitchen Clean

1. Start With A Clean Kitchen
Starting with a clean kitchen makes your time in the kitchen much more enjoyable. There is nothing more frustrating than trying to find a pot only to discover it's sitting in the sink. Or trying to cut vegetables with a cluttered counter. Have the kids quickly pick up any messes in the kitchen when they arrive home from school. My youngest, four years old, loves to wash the dishes. She feels important when she does.

2. Speedy Clean List
Have a speedy clean list, making it your goal to never spend more than 20 minutes cleaning your kitchen. In that 20 minutes you should be able to wash the dishes, wipe the counters and stove (drip pans included), and sweep the floor. Twenty minutes a day doing this will go a long way in maintaining the integrity and joy of your kitchen.

3. Never Go To Bed With Dirty Dishes

This is our best secret. One of the biggest ways to make a kitchen look dirty is by having a sink full of dirty dishes. It also takes a lot of stress off the next day knowing you don't have dishes awaiting you. You can easily fill the coffee pot with water, because you don't have to shove a bunch of dishes around. Odors don't develop overnight from leftover food and you spend less time, within 20 minutes, in the kitchen later because you're not spending all your time scrubbing stuck on food. Why is this my best secret? you wonder. Because I have one great tip for you on this: RINSE AND LOAD. Recite that like a mantra in your home. Say it to your kids until they are sick of hearing it: RINSE AND LOAD. It literally takes less than one minute to rinse a plate and place it in the dishwasher. Take this free printable I created, hang it over the sink or somewhere else in your kitchen. But make sure your kids, and yourselves, consistently remember to RINSE AND LOAD.

|| DOWNLOAD ||
Graphic courtesy of The Graphics Fairy

4. Clean While You Cook
This is something my mom taught me when I was learning how to cook. Instead of throwing a skillet into the sink when you're done using it, give it a quick rinse first. Instead of using three different spoons for stirring each pot, rinse one off and reuse it. If you spill on the stove while cooking, wipe it up with a paper towel right away, instead of letting the egg or sauce dry. This is something that drastically increases your clean time later. We want to do anything that might help keep our kitchen time down to 20 minutes.

5. Clean Your Fridge Twice a Month
Refrigerators are one of the biggest breeders of germs in your home. Food gets shoved to the back and grows mold. You lose more plastic storage containers than you can shake a stick at. Clean your fridge twice a month (or when you go grocery shopping). This will get the smells and rotten food out, free up any storage containers you can use, and give you a better idea of what is truly available when you are ready to go grocery shopping.

6. Use Non-slip Rug Pads
One of my biggest pet peeves is when bottles get tipped over in my fridge and in my cabinets. This clutters up the space, liquids leak out, and generally becomes a huge mess. To prevent this from happening, use non-slip rug pads on your flat surfaces. Your glass bottles will no longer slip around in your fridge. You can spray paint them, too, to a little pop of color to the inside of your refrigerator door!

7. Use Designated Containers for Kids
I don't know about your kids, but the first thing mine do when they get home from school is raid the kitchen. They make messes without even realizing it, and eat half the house before dinner is even served. To maintain their clutter, have designated bins for them.  Use some vinyl to adhere their names to a plastic container, and fill them with what they may have that day. This will keep your food budget under control and teach your kids limitations. If they have leftovers from their sack lunches, they can put them in their own bins. 

8. Make Use Of Storage Racks
These days you can buy storage racks for just about anything, from spices to pots and pans. Fully invest in these. Some may be pricey, but they make organizing your cabinets so much easier, which in turn makes your time in the kitchen less painstaking.

9. Store Bagged Items Properly
In continuing with your cabinet organization, invest in storage containers for your bagged items, such as a cereal, beans, or rice. All those bags do is create clutter. In my home, they tend to get stacked on top of one another, and I never know if I have a bag of rice or a bag of black beans available. Oftentimes I wind up buying rice when I already had a bag there. I just didn't see it!

10. Deep Clean Once A Month
My final tip is to deep clean your kitchen once a month. And by deep clean, I mean the whole thing, top to bottom. Scrub the floorboards, beneath the cabinets, inside and outside of the cabinets, on top of the fridge, inside the oven, and so forth. Keeping up on these necessary chores helps keep your kitchen sparkling all year long!

Image © Chalon Handmade || Graphic Design by NewlyMynted

Happy Cleaning!
Steph

Thursday, January 23, 2014

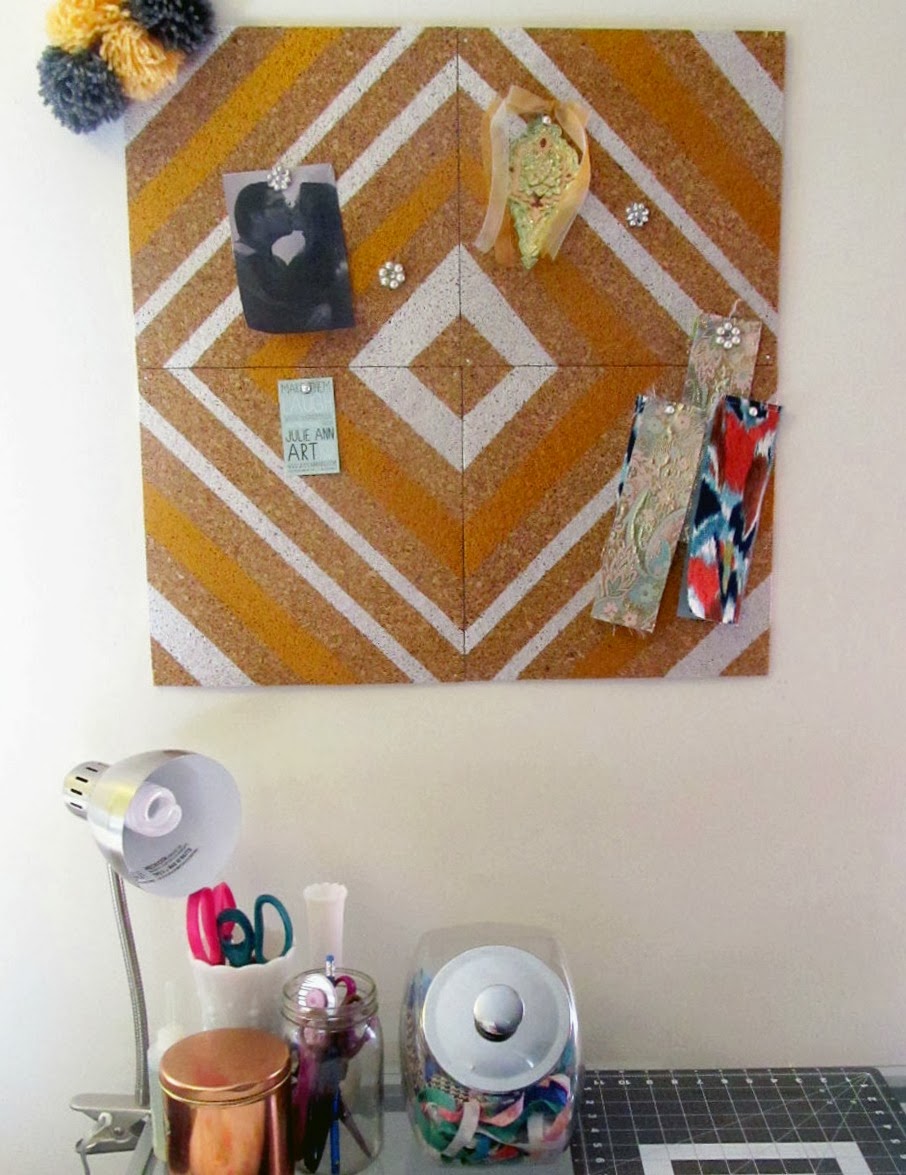
DIY Geometric Cork Board


First I'd like to apologize for the lack of personal posts. Sadly, my rechargeable batteries have gone caput. They will no longer hold a charge. These are the last photos I was able to get out of it. It's very saddening. My camera gets so much love, and now it is feeling so very lonely, sitting there upon my desk all alone, neglected. Single-mom's Budget Syndrome has prevented me from being able to spoil it and buy it new batteries. I've had to put what extra money I have into some health expenses. Hooey is what I say!

Okay, I'll get to the task at hand now, this lovely diamond painted cork board I hung in my studio. I was inspired by this blog post from The Happy Home when I stumbled upon it on Pinterest. Oh, good ol' Pinterest! I had picked up a pack of cork tiles at Big Lots over the summer and they had been sitting here for months. Then Ms. Belinda came to my rescue and was just the right inspiration for me!

All you'll need are:
Painters Tape
Paint
Brush

Simple enough, tape off your lines. I did a mix of skinny and thick, because both are beautiful and can complement the other lovingly.
 Make sure all your lines match up. This is also where I would recommend taking an extra piece of tape and labeling each square 1-4. The reason I say that, is I didn't and they got mixed up, then I had to play a puzzle game to get the lines matched up again. Good thing I like puzzles!
 And it is reasons like this I love Folkart. I have mixed metals all throughout my house, so I used Pearl White and Royal Gold.

Yeah, that's a shout out to my girl, Julie at Julie Ann Art. Buy her cards. Seriously. People die laughing when they read all the cards I buy for Logan. I already have his Valentine's Day card ready. Her new cardstock is like magic. 
I finished off my little corky space with some tacks I DIY'ed. Those are just scrapbooking embellishments I super glued onto tacks. Now I have fancy tacks to hold up all the junk that would normally get thrown on my cutting table.

And there ya go. An inexpensive and easy DIY to add a pop of geometric style to your plain white apartment walls. 

Love and that jazz!
Steph

Monday, January 13, 2014

Summer Decor Inspiration | Modern Romance

I'll give you one guess where I spent my weekend. I was at Michael's. I had stopped in Saturday for some paint for a project I'm going to be doing this week. The signs for 90% off holiday baskets reeled me toward the back of the store. And would you believe what I found when I turned around? They had begun putting out the new Ashland Summer Collection. This years signature accents collection is called Modern Romance. I just had to share it with you, in case you haven't happened upon it yet.
I spent a good while Saturday oohing and ahhing over everything, saying to Logan's mother, who was with me, "I want that, and that, and that ..." as I pointed to each new thing I saw that delighted me. It is simply one of those collections that you can't help but feel serenely happy in.
I adore those pink apothecary bottles. They had them displayed in the store with pink and white feathers in them. They were darling! I also have those chandelier style candle holders on my wish list.


Way to class up an owl! So chic!
More importantly, however, is I want that pink vase with the rhinestone starburst on the front. I actually picked up a couple pieces of crystal at TJ Maxx just before hitting up Michael's, and I think it will go lovely with them.

Ooh, wait. I just noticed something as I'm gazing at this photo. That planter to the left is a decorative storage box. What a unique way to use it. I'm thinking perhaps some of my storage boxes need some flowers adhered to the lid for an extra pop in my studio.

After thinking on this set all evening Saturday, I went back Sunday for a piece. I picked up a bouquet bundle to go in a hand painted vase I had previously purchased from Hello Awesome. The bouquets are on sale for $4.99 this week. Start your romance collection!

I hope this inspires and delights you this Monday morn. 

All images courtesy of Michael's.com

Au revoir!
Steph

Monday, August 26, 2013

An in-depth guide to mildewy towels

The water is piping, warmth streaming down your back. Feeling clean, refreshed, you shut off the shower and reach for your towel. And there it hits you, that stinky smell of mildew built up in the fibers that you are now spreading all over your body as you dry off. Your clean, refreshing shower is now officially ruined from that putrid stench.

That's pretty much how I felt for a time. My towels smelled horrid. Every time I dried myself off, I felt I was spreading mold and mildew all over my skin. Yes, I said mold. You know that nasty stuff that builds up along the bottom of your shower curtain liner? That's what is building up in your towels, making them smell as bad as they do. I found there were easy ways to clean them, but I wanted to know what caused it and why. So I did some research and here is what I found:

First let's talk towels. Towels are made of 100% cotton. The absolute finest cotton towel you can buy is Egyptian cotton. It has a very expensive weave, making it more absorbent and soft. The next best thing is Pima cotton, also very absorbent. The absorbency is why they make such a great use for towels, they absorb water quickly. These towels can easily run you upwards of $10-$15 per bath towel. Often you find towels that say something along the lines of "made with" Pima or Egyptian cotton. These often contain other low quality materials. It's all about marketing!

Over time, with use (or wear and tear) towels begin to lose their absorbency. Low quality towels do so more quickly. Eventually they begin to absorb bacteria and fungi that build up in the bathroom. An additional cause of towels losing their absorbency is how they are washed. Too much detergent can saturate the close-knit fibers in a towel, and fabric softener coats them. Imagine my surprise to find that little Snuggles bear has been deceiving me all this time with his fluffy basket of towels. Cuteness be darned!

Never fear, for there is an easy solution:
Wash no more than three large towels at a time with 1 1/2 cups of white vinegar in HOT water. Run the load again with 1/2 cup of baking soda, also in hot water. Dry them until they are completely dry. Not just hot, but dry. Do not use fabric softener. Mine were pretty bad smelling and this washing technique helped get almost everything out. If only you could have seen me standing in the laundry room, sniffing my towels as they came out of the dryer. It was like heaven, and people thought I was strange. If only they knew ...!

You can also make your life easier and use some preventative measures to keep this build up from forming. After each shower leave a window open or the bathroom fan running to allow the moisture in the room to escape. Don't wash your towels in large quantities. Continue to wash them in vinegar, as the acidity gets the really dirty things clean. Do not wash them in detergents (unless it is anti-microbial) or dry with fabric softeners. A fungus-free, smelly good towel is far better than a Downy soft towel in my opinion.

I hope my bit of research is useful to you. Do you have any natural ways of cleaning mildew around your home?

Much love from my home to yours!
Steph
Image courtesy missmac
Graphic design by NewlyMynted
Facebook        Twitter        Pinterest         Instagram        Email