Showing posts with label Decor. Show all posts

Monday, February 10, 2014

Amazing Weekend Finds

I have been quite sick for several days. Toady is my first day out of bed. I certainly wasn't going to leave you cringing, biting away at those pretty fingernails, wondering if there would be a blog post. While I have a couple of drafts going, I thought this morning I would take it easy on myself, yet make it exciting for you. Today I have a collection of some of my favorite finds from my time on bed rest. We have style inspiration and decor inspiration for you to feast your hungry eyes on. 

1. Learn how to tuft and reupholster a sofa over at Classy Clutter. Honest to goodness, her living room made my heart swoon! I want a gray lounge chair in my living space, so this was just the right inspiration I needed for a future DIY project.
2. With summer almost in reach, many of us are working on getting ourselves bikini ready. Yesterday I nearly gasped at this scalloped one piece from Nasty Gal. I also love this suit because it gives the right amount of coverage for my self-consciousness. I do not like to flash my stretch marks and this one covers that area exactly while still allowing me to feel great in my skin.
3. Last week I stumbled upon the sister duo Jeans and Teacup after Jessica linked up to Funday Monday, which I co-hosted. I was instantly impressed by their blog, so I stayed awhile and browsed around. I was so glad I did, because I found this amazing emerald skirt Jessica flaunted. What a statement!
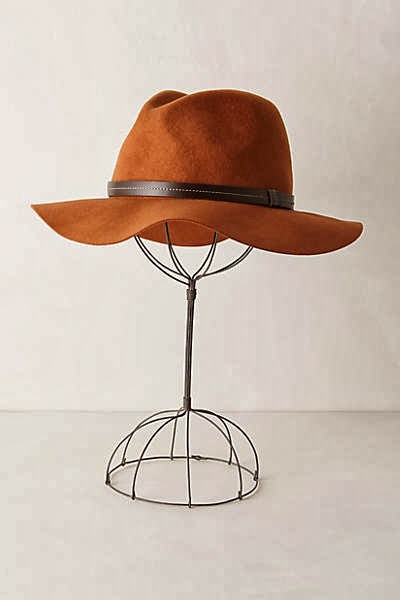
4. I honestly could not say what it is about this rancher hat from Anthropologie that makes me happy, but it just does. I love hats!
5. One of my favorite magazines is Better Home & Gardens. I am always browsing through a mag or on their site, looking for new inspiration. And they never disappoint, like this decorative floral mirrors made from egg cartons. I think I will be saving the next few dozen eggs I buy!

6. Have you ladies heard of Ace & Ivy? They are an up-and-coming discount beauty boutique, and just this morning I saw these darling floral wayfarer sunglasses posted up for only $6.99! How cheap is that? I already snatched myself a pair, so head over and get yours too. They are only available at this price for a brief period of time.
What goodies inspired you this weekend?

XO,
Steph

Thursday, January 23, 2014

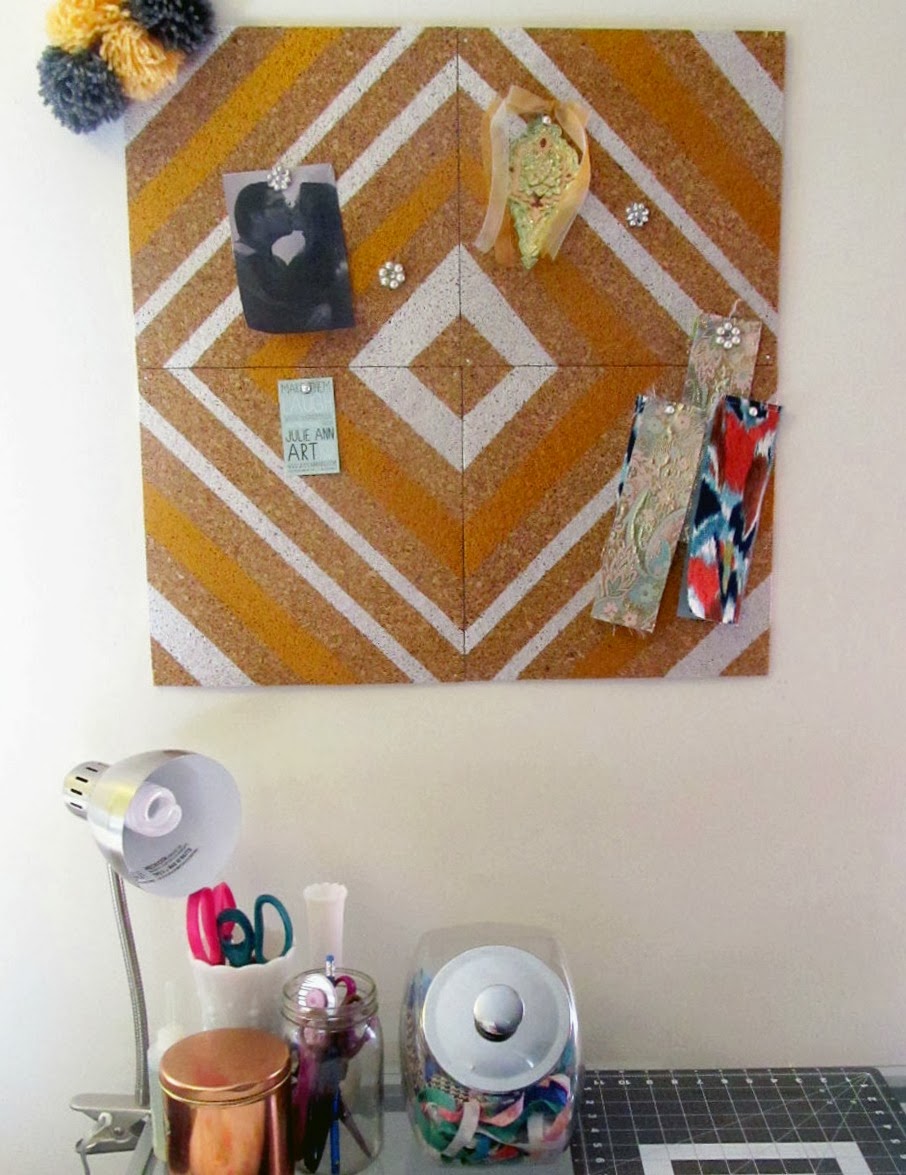
DIY Geometric Cork Board


First I'd like to apologize for the lack of personal posts. Sadly, my rechargeable batteries have gone caput. They will no longer hold a charge. These are the last photos I was able to get out of it. It's very saddening. My camera gets so much love, and now it is feeling so very lonely, sitting there upon my desk all alone, neglected. Single-mom's Budget Syndrome has prevented me from being able to spoil it and buy it new batteries. I've had to put what extra money I have into some health expenses. Hooey is what I say!

Okay, I'll get to the task at hand now, this lovely diamond painted cork board I hung in my studio. I was inspired by this blog post from The Happy Home when I stumbled upon it on Pinterest. Oh, good ol' Pinterest! I had picked up a pack of cork tiles at Big Lots over the summer and they had been sitting here for months. Then Ms. Belinda came to my rescue and was just the right inspiration for me!

All you'll need are:
Painters Tape
Paint
Brush

Simple enough, tape off your lines. I did a mix of skinny and thick, because both are beautiful and can complement the other lovingly.
 Make sure all your lines match up. This is also where I would recommend taking an extra piece of tape and labeling each square 1-4. The reason I say that, is I didn't and they got mixed up, then I had to play a puzzle game to get the lines matched up again. Good thing I like puzzles!
 And it is reasons like this I love Folkart. I have mixed metals all throughout my house, so I used Pearl White and Royal Gold.

Yeah, that's a shout out to my girl, Julie at Julie Ann Art. Buy her cards. Seriously. People die laughing when they read all the cards I buy for Logan. I already have his Valentine's Day card ready. Her new cardstock is like magic. 
I finished off my little corky space with some tacks I DIY'ed. Those are just scrapbooking embellishments I super glued onto tacks. Now I have fancy tacks to hold up all the junk that would normally get thrown on my cutting table.

And there ya go. An inexpensive and easy DIY to add a pop of geometric style to your plain white apartment walls. 

Love and that jazz!
Steph

Monday, January 13, 2014

Summer Decor Inspiration | Modern Romance

I'll give you one guess where I spent my weekend. I was at Michael's. I had stopped in Saturday for some paint for a project I'm going to be doing this week. The signs for 90% off holiday baskets reeled me toward the back of the store. And would you believe what I found when I turned around? They had begun putting out the new Ashland Summer Collection. This years signature accents collection is called Modern Romance. I just had to share it with you, in case you haven't happened upon it yet.
I spent a good while Saturday oohing and ahhing over everything, saying to Logan's mother, who was with me, "I want that, and that, and that ..." as I pointed to each new thing I saw that delighted me. It is simply one of those collections that you can't help but feel serenely happy in.
I adore those pink apothecary bottles. They had them displayed in the store with pink and white feathers in them. They were darling! I also have those chandelier style candle holders on my wish list.


Way to class up an owl! So chic!
More importantly, however, is I want that pink vase with the rhinestone starburst on the front. I actually picked up a couple pieces of crystal at TJ Maxx just before hitting up Michael's, and I think it will go lovely with them.

Ooh, wait. I just noticed something as I'm gazing at this photo. That planter to the left is a decorative storage box. What a unique way to use it. I'm thinking perhaps some of my storage boxes need some flowers adhered to the lid for an extra pop in my studio.

After thinking on this set all evening Saturday, I went back Sunday for a piece. I picked up a bouquet bundle to go in a hand painted vase I had previously purchased from Hello Awesome. The bouquets are on sale for $4.99 this week. Start your romance collection!

I hope this inspires and delights you this Monday morn. 

All images courtesy of Michael's.com

Au revoir!
Steph

Wednesday, November 6, 2013

Anthro hack: Rosette Pillow Shams

Now that we know how to use our ruffler foot, we're going to be making these darling pillow shams. 

Our inspiration
These Rosette Shams from Anthropologie. I fell in love with these and just knew I needed to make them. It gives that extra punch of femininity to my bed. I did consider painting polka dots on my fabric, but I have another pillow cover to make and that fabric has polka dots on it already, so I decided to keep mine a solid color. But if you want polka dots, by all means, paint some on with some fabric paint. Go hog wild! Have a blast!

You will need:
1.5 yards of fabric
Coordinating thread
Sewing machine
Standard presser foot
Ruffler foot
Scissors
Cut:  THESE DIMENSIONS ARE FOR A STANDARD SIZE PILLOW, 29" X 21".
Seam allowances are included with the measurements
Back of sham - 36 x 21.75 inches (cut 1)
Front middle section - 15.5 x 21.75 inches (cut 1)
Front ruched section - 7.25 x 42 inches (cut 2) 

With your presser foot properly in place, adjust the ratchet gear feed plate to 6 and your machine's stitch length to 3. Weave your fabric through the cloth guide and begin sewing ruffles down the width of all the ruche sections. It will automatically sew a 1/4" seam. (Check out the Sewing 101 series or the tutorial on how to use the ruffler foot if you need more information.)
Here's a better idea of what you should have when you're done. You will ruffle the width of both sides on each cut you made. The sections will shrink considerably, about 1.5 times their original size, to about the same 21.75" width of your other pieces. Press all of your seams and ruffles, allowing them to lay as they will. You can see some of mine are a little haphazard. That's what you want.
Replace your ruffler foot with your standard presser foot and adjust your stitch length to 2. Right sides together, sew each of the ruche sections to either side of the the middle section with a 3/8" seam. Serge or zigzag (use the smallest stitch length possible) the edge of the seam to finish it off. I'm sorry I don't have a better picture of each section going together. Essentially, you should have the front of your pillow sham fully assembled.
Using a longer stitch length (I use 4), press the seam to the right (toward the ruche section) and straight stitch it down 1/8" from your seam line. This will give your panels more of a profesh look!
Now that we're talking about this being all professional and what not, remember perfection is not necessary in this next step. Find the middle of your ruche section and sew a straight line all the way down. Repeat this step on either side of the middle line you just sewed. We are trying to tame that poofy look you get with such large ruffled pieces, while keeping that professional appeal about it. That's the great thing about shabby chic styles, chic style without the clean boring lines. After all, Perfection is Never an Option!
Cut your back piece vertically down the center. (Remember: it's longer in length than width; cut down the width.)
Pin one half to the left side of the front of your sham and sew it in place with a 3/8" seam allowance. Repeat on the right side with the other half of the back.
Press the seams and serge/zigzag each hem to finish them off. You should now have one really long strip of fabric. We're going to close that off soon and shape our sham.
Fold the edge of the right side of the sham 1/2" and press. Fold it again, press again, then sew 1/4" inch from the edge of the hem.
Repeat the previous steps on the left side of the sham, but fold and press this side 1".
Now let's create our cases. Fold the left back piece over, right sides of the sham facing. This side should fall several inches to the right of the center of the sham. Then fold the right side of the back of the sham over. (Be sure you fold each side along the outside seam of each ruched section. I accidentally folded on the inside seam of one and couldn't quite figure out for a bit why my sham wasn't laying right.)
Pin all the away across the top and bottom and sew the seams into place with a 3/8" seam. Be sure the one inch hem is on the inside and the one half inch hem is on the outside before you do. This makes a difference when you go to turn it. Clip your corners, turn it right side out, and you're done. You've created beautiful shams. For a fraction of the cost. Congratulations!
Happy sewing!
Steph  
Facebook        Twitter        Pinterest         Instagram        Email

Friday, August 16, 2013

Color Crush: Cobalt

Cobalt Booties Cat eye frames Chandelier Earrings Velvet Pillow Double Breasted Military Coat Wave Wrap Bleu Cobalt Laquer Safety Clutch Envelope Clutch iPhone Case Cobalt Vase Image Map
For almost the past year I have had the biggest crush on blue handbags. Bright, striking blue handbags! Cobalt blue. Electric blue. Although I have yet to find one I absolutely adore with a price tag that's within my budget, I have not relented my swooning. My fascination has expanded to nail polish, jewelry and clothing, and a desire to expand my blue joy around my home.

This is what I like to call growth! For most of my adult life I have avoided blue like the plague. Navy blue is a terrible color on me, and because I couldn't wear navy, I just avoided blue altogether. My bigotry caused me to lose out on all this cobalt blue richness. No more though. This fall I plan to embrace blue as much as I can!

What are your color crushes?

Oodles of love today!
Steph
Facebook        Twitter        Pinterest         Instagram        Email
Sharing with:

Monday, July 22, 2013

Living room inspiration ... HELP!

I've been doing a lot of pondering over how I to style my living room. It has sat untouched, mostly filled with the secondhand items I've looted over the past several months. Before moving, my grandparents gave me a vintage sofa set. Vintage and velvet, hells ya! I love it! I do not love that it is tan, though. I also do not love that they match. I want them coordinating, not matching.

I decided to start with the sofa first. And I immediately turned to my BFF, Candace. Of course she knows me well, and suggested I reupholster the sofa in bright turquoise or teal. I FELL IN LOVE WITH THAT IDEA! More so when I saw this image from Home Beautiful with the deep turquoise sofa accented with the silver table. I had already wanted to redo my coffee table silver. (My main theme throughout my home is "Mixed Metals" with splashes of color.) Nothing like having my thought process confirmed by designers. Thank you, designer, for testing the waters for me. Much appreciated!

Here en-lies my problem, and where I need your advice, dear readers. I live in a small town and have no vehicle, so I can't go gallivanting all over NC to find a fabric shop that sells turquoise velvet upholstery fabric. So I need to buy online. Did you know turquoise velvet upholstery fabric isn't quite as dime-a-dozen as, say, black, brown or gray? Yeah ... I do now. 

The best I could find is this swatch from Joann's. Retail price .... $64.99/yd. WHAT THE BLEEP?!! Even with a 40% off coupon I'm still looking at over $585 to reupholster this. That is definitely not within my budget anytime soon. Single momma of three here!

I thought maybe I could compromise and just do the cushion, leaving the rest tan. I know I can throw in more splashes of color with accent pillows. My fear is that it will lose that richness I'm going for. I found this image on Beautiful Home, too, where a designer did something similar to what I had in mind with patio furniture. But you can see a huge difference in style. This has more of a beachy feel, which is not what I am going for. And what about my silver table? It seems I would lose the mixed metal effect by having my sofa tan.

Here is what I'm asking:
Does anyone know of an online retailer that sells the fabric I'm looking for at a more affordable price?
What are your thoughts on my alternative idea? Do you agree with the difference in design styles? And losing the silver effect?
Any other alternative suggestions?

I am stumped. A little disheartened. But determined and anxious! You wouldn't happen to know any design genie's, would you?

Lots of love and Monday greetings!
Steph
Facebook        Twitter        Pinterest         Instagram        Email

Monday, July 8, 2013

Revamp Your Closet Doors

(Sorry for the iffy photo. It has been nothing but overcast and rain here in the high country. Can I just say, I miss sunlight.)

A great way to bring new life to your room is by adding decorative curtains to your closet doors. Being in an apartment, I am limited with what I can do in my space. I fill my bedroom with mixtures of soft textures, mixed metals, and bright colors. Imagine my surprise when my neighbor offered me these delicate, powder blue curtains. My dresser is a very rich color (peacock green), so I needed soft hues surrounding it. I knew these curtains would be perfect for adding a splash of color to the walls without overwhelming the space. In fact, they really tie the corner of the room together, creating such romantic look. I love sleeping here! 

I also did a little rearranging, and now the vintage Gimbel's dresser that holds my fabric stash is just to the left of the closet. Once I get the headboard finished (it will be comprised of old dresser drawers), I will show you guys the whole bedroom.

What do you in your space?

Love dearly,
Steph
Facebook        Twitter        Pinterest         Instagram        Email

Thursday, June 27, 2013

DIY Burlap Flower Door Decoration


I have wanted some kind of decoration on my front door for years. What would go there has been a tough decision for me, though. I have always felt what was displayed on the front of my door should reflect what someone would find on the other side of it. After many internal debates, I had finally decided that what went on my front door needed to incorporate the words "Love Lives Here." I want my home surrounded with love! This is, after all, the Lord's home. 

A few weeks ago I was wandering through Michael's craft store and saw this huge burlap flower with black trim. It was beautiful! I had tons of burlap fabric and black pipe cleaner, so I got to work.


I free-handed a flower petal the size I wanted. Mine measured approximately 8" in height. How many petals you cut will depend on how large or full your flower will be. I cut eight. Flip your pattern over and cut out eight more (or whatever your number is).


Placing them wrong-sides together, take one petal from each pile and sew them together.

TYPO! Oh well, I'm not perfect anyway, remember?

Get out that glue gun! Attach your pipe cleaner along the stitch line of each petal. 


Arrange your petals in a circle however you like them best. Then using your glue gun, just put a dab at each overlapping corner to keep them in place.


Then cut out a circle of felt and glue it to the back. Now all of your pieces are nice and secure. Embellish the middle and your flower is done. I didn't add a photo of this. I just used a jewelry piece on mine.

Let's move on to the sign, shall we? 

Tra-la-la-la, it's off to the signage we go ...


To keep this simple, I used a couple pieces of die-cut cardboard and letters I had on hand. (Shh ... don't tell my mom, but I used her die-cuts on shoe boxes awhile back.) Glue your letters down and ... tra-la-la ....


Paint them! I spray painted them gold, then black, giving them an antiqued look. 

FYI: Whilst painting these outside, my neighbor said, "Painting again? You're always painting something. You're the painting lady." That's right, I've got myself a reputation!

I attached them with ribbon, and was done.


I love this. It reflects me perfectly. I am a tender-hearted person, always eager to love people. More so the older I get. And of course I love flowers.

So this is what you'll find at my little abode here in Boone. What will I find on the other side of your door?

Love dearly,
Steph

Facebook        Twitter        Pinterest         Instagram        Email