Showing posts with label How-to's. Show all posts

Thursday, February 6, 2014

How to Keep Your Kitchen Clean

1. Start With A Clean Kitchen
Starting with a clean kitchen makes your time in the kitchen much more enjoyable. There is nothing more frustrating than trying to find a pot only to discover it's sitting in the sink. Or trying to cut vegetables with a cluttered counter. Have the kids quickly pick up any messes in the kitchen when they arrive home from school. My youngest, four years old, loves to wash the dishes. She feels important when she does.

2. Speedy Clean List
Have a speedy clean list, making it your goal to never spend more than 20 minutes cleaning your kitchen. In that 20 minutes you should be able to wash the dishes, wipe the counters and stove (drip pans included), and sweep the floor. Twenty minutes a day doing this will go a long way in maintaining the integrity and joy of your kitchen.

3. Never Go To Bed With Dirty Dishes

This is our best secret. One of the biggest ways to make a kitchen look dirty is by having a sink full of dirty dishes. It also takes a lot of stress off the next day knowing you don't have dishes awaiting you. You can easily fill the coffee pot with water, because you don't have to shove a bunch of dishes around. Odors don't develop overnight from leftover food and you spend less time, within 20 minutes, in the kitchen later because you're not spending all your time scrubbing stuck on food. Why is this my best secret? you wonder. Because I have one great tip for you on this: RINSE AND LOAD. Recite that like a mantra in your home. Say it to your kids until they are sick of hearing it: RINSE AND LOAD. It literally takes less than one minute to rinse a plate and place it in the dishwasher. Take this free printable I created, hang it over the sink or somewhere else in your kitchen. But make sure your kids, and yourselves, consistently remember to RINSE AND LOAD.

|| DOWNLOAD ||
Graphic courtesy of The Graphics Fairy

4. Clean While You Cook
This is something my mom taught me when I was learning how to cook. Instead of throwing a skillet into the sink when you're done using it, give it a quick rinse first. Instead of using three different spoons for stirring each pot, rinse one off and reuse it. If you spill on the stove while cooking, wipe it up with a paper towel right away, instead of letting the egg or sauce dry. This is something that drastically increases your clean time later. We want to do anything that might help keep our kitchen time down to 20 minutes.

5. Clean Your Fridge Twice a Month
Refrigerators are one of the biggest breeders of germs in your home. Food gets shoved to the back and grows mold. You lose more plastic storage containers than you can shake a stick at. Clean your fridge twice a month (or when you go grocery shopping). This will get the smells and rotten food out, free up any storage containers you can use, and give you a better idea of what is truly available when you are ready to go grocery shopping.

6. Use Non-slip Rug Pads
One of my biggest pet peeves is when bottles get tipped over in my fridge and in my cabinets. This clutters up the space, liquids leak out, and generally becomes a huge mess. To prevent this from happening, use non-slip rug pads on your flat surfaces. Your glass bottles will no longer slip around in your fridge. You can spray paint them, too, to a little pop of color to the inside of your refrigerator door!

7. Use Designated Containers for Kids
I don't know about your kids, but the first thing mine do when they get home from school is raid the kitchen. They make messes without even realizing it, and eat half the house before dinner is even served. To maintain their clutter, have designated bins for them.  Use some vinyl to adhere their names to a plastic container, and fill them with what they may have that day. This will keep your food budget under control and teach your kids limitations. If they have leftovers from their sack lunches, they can put them in their own bins. 

8. Make Use Of Storage Racks
These days you can buy storage racks for just about anything, from spices to pots and pans. Fully invest in these. Some may be pricey, but they make organizing your cabinets so much easier, which in turn makes your time in the kitchen less painstaking.

9. Store Bagged Items Properly
In continuing with your cabinet organization, invest in storage containers for your bagged items, such as a cereal, beans, or rice. All those bags do is create clutter. In my home, they tend to get stacked on top of one another, and I never know if I have a bag of rice or a bag of black beans available. Oftentimes I wind up buying rice when I already had a bag there. I just didn't see it!

10. Deep Clean Once A Month
My final tip is to deep clean your kitchen once a month. And by deep clean, I mean the whole thing, top to bottom. Scrub the floorboards, beneath the cabinets, inside and outside of the cabinets, on top of the fridge, inside the oven, and so forth. Keeping up on these necessary chores helps keep your kitchen sparkling all year long!

Image © Chalon Handmade || Graphic Design by NewlyMynted

Happy Cleaning!
Steph

Thursday, January 23, 2014

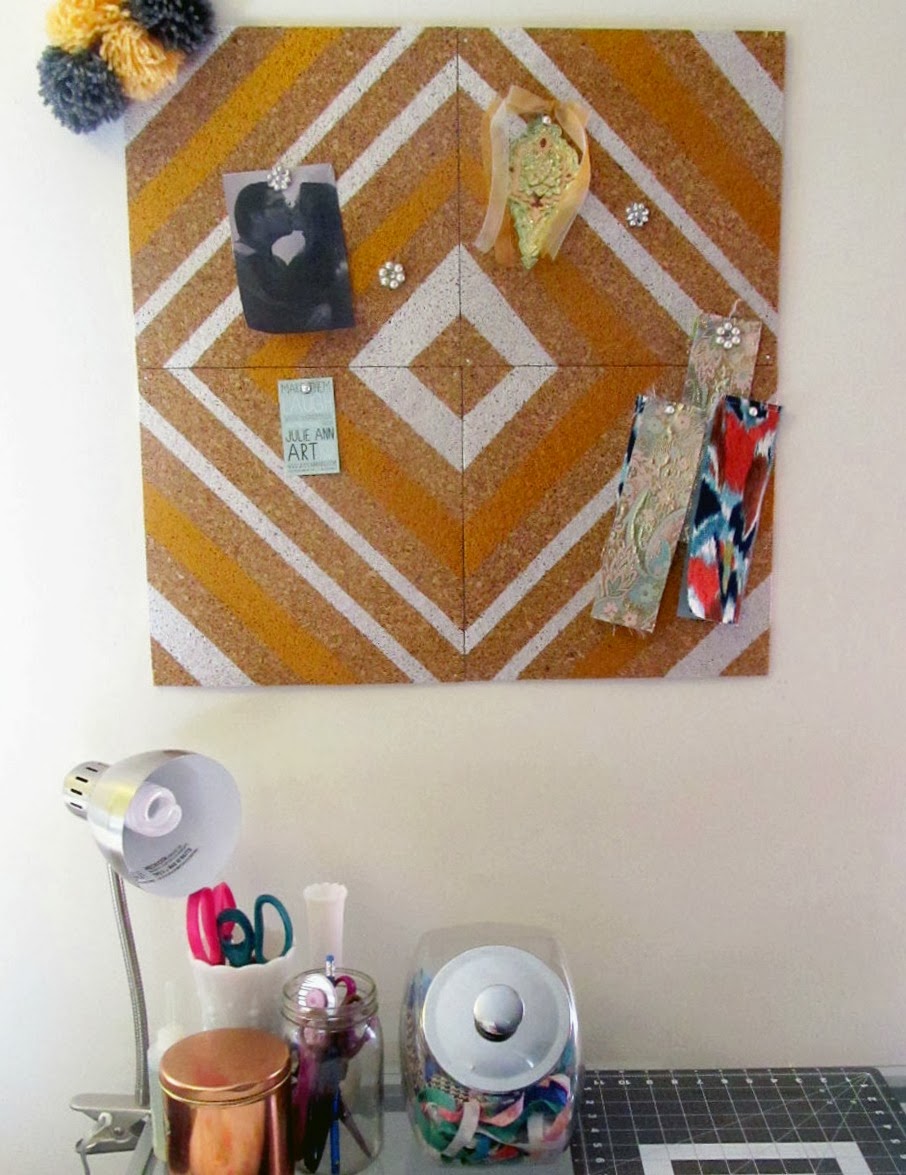
DIY Geometric Cork Board


First I'd like to apologize for the lack of personal posts. Sadly, my rechargeable batteries have gone caput. They will no longer hold a charge. These are the last photos I was able to get out of it. It's very saddening. My camera gets so much love, and now it is feeling so very lonely, sitting there upon my desk all alone, neglected. Single-mom's Budget Syndrome has prevented me from being able to spoil it and buy it new batteries. I've had to put what extra money I have into some health expenses. Hooey is what I say!

Okay, I'll get to the task at hand now, this lovely diamond painted cork board I hung in my studio. I was inspired by this blog post from The Happy Home when I stumbled upon it on Pinterest. Oh, good ol' Pinterest! I had picked up a pack of cork tiles at Big Lots over the summer and they had been sitting here for months. Then Ms. Belinda came to my rescue and was just the right inspiration for me!

All you'll need are:
Painters Tape
Paint
Brush

Simple enough, tape off your lines. I did a mix of skinny and thick, because both are beautiful and can complement the other lovingly.
 Make sure all your lines match up. This is also where I would recommend taking an extra piece of tape and labeling each square 1-4. The reason I say that, is I didn't and they got mixed up, then I had to play a puzzle game to get the lines matched up again. Good thing I like puzzles!
 And it is reasons like this I love Folkart. I have mixed metals all throughout my house, so I used Pearl White and Royal Gold.

Yeah, that's a shout out to my girl, Julie at Julie Ann Art. Buy her cards. Seriously. People die laughing when they read all the cards I buy for Logan. I already have his Valentine's Day card ready. Her new cardstock is like magic. 
I finished off my little corky space with some tacks I DIY'ed. Those are just scrapbooking embellishments I super glued onto tacks. Now I have fancy tacks to hold up all the junk that would normally get thrown on my cutting table.

And there ya go. An inexpensive and easy DIY to add a pop of geometric style to your plain white apartment walls. 

Love and that jazz!
Steph

Monday, January 6, 2014

Create Gold Foil Text in Photoshop

I have been in love with the new trend of metallic gold lettering in graphic design. Who doesn't love shiny text! I bet if you do, you've been wondering how to get it. I mean, your text doesn't just come in those fancy letters. There is no Hex code for that metallic sheen. So I knew this would make for a great tutorial to share with you all. 

Open the canvas you will be working on, as well as the gold foil texture you want to use. You can see with the arrows I have the Create Foil Text document open and the Foil Background open. THIS is the free gold foil background I used for this tutorial. Another great gold foil digital texture pack is THIS one from Mommyish.

Working on your Foil Text canvas, create a new layer. In Photoshop, the small piece of paper with the corner marked is the new-layer icon. You can see in the layers pallet, Layer 1 has been created. You can rename this by double-clicking it if you wish. I did not for this tutorial since it is the only additional layer I'm working with.

 Toggle over to your window with the gold foil background. Select the whole thing and copy it.

Toggle back over to your canvas and paste the gold foil background to the layer you just created. If you look at Layer 1 in your layers pallet, you now see it has a gold rectangle in it, displaying to you what is in that layer. Be sure you have Layer 1 highlighted before you paste the background to it.

First, move the layer up or down until it is directly over the text you want to add texture to. You can easily do this by clicking and dragging. Now right-click on Layer 1 and select Create Clipping Mask.

You just clipped two layers together! And only with the click of a button! If you look at Layer 1 in your layers pallet, you will see a small downward pointing arrow on the left side. That arrow indicates that that layer is clipped to the one below it, and whatever is in that layer (Layer 1) will reflect only within the layer it is clipped to.

Adjust the size and/or position of the gold foil texture until it is how you like it. This is easily done by highlighting Layer 1 in the pallet (it should be selected on your canvas as you see in the previous photo), press V on your keyboard to select your Move Tool (or toggle it on the left [see photo]) and adjust the size and position. Another quick note: holding Shift while adjusting one of the corners will maintain the proportions of the background layer.

There, you're done! Your text is gold and shiny and beautiful! Give yourself a little pat on the back.

What other things would you like to learn to do in Photoshop? Let me know in the comments or send me an email: newlymynted@gmail.com. You can also follow us on Facebook to stay up-to-date on new tutorials.

XO,
Steph

Tuesday, November 12, 2013

Uses for Old Sweaters

Winter is approaching, bells are beginning to sound. Soon snow will be falling soft. While I am not a fan of cold weather, I love feelings of winter. Cozy sweaters paired with your favorite boots. Curling up under a warm blanket with a cup of hot cocoa and a good book. Prepping for the holidays. Yes, I have already begun. I have started my list of handmade gifts. A hint: I made my kids take a bag outside yesterday and fill it with dirt for Snookums present.

Since I do love a cozy sweater, I have been perusing Goodwill for them. My endeavors have failed time and again, as they are almost never in my size and the ones that are always seem to be picked pretty bad. This is where my sweet little brain got to thinking, something ought to be done with all those pretty sweaters I keep seeing. 

Skip ... skip ... skip, off to Pinterest we go ... I scoured their pages for some of the neatest things to do with those old sweaters. As always, Pinterest did not disappoint. There was so much inspiration!
This is my idea of a cozy blanket! Make a patchwork quilt with old sweaters.
For those bitter chilling days, turn a sweater into a scarf.
I almost always wear socks in the winter time, so these would be perfect for me to make. Turning a sweater into a pair of slippers would also be a great money saver since I do tend wear them out. What can I say, I hate cold feet.
What a perfect way to reuse your kiddos old sweaters they've outgrown from last year. Make them some new slippers and present them under the tree this holiday.
Should've put a bow on it! A great idea if your sweater seems come unraveled: add an embellishment.
I recently accidentally dried my favorite wool sweater. Imagine my poor little heart sinking upon finding it, warm and cozy and ... toddler size as I extracted it from the drier. I was devastated. Thank you, Lana Red Studio, for lifting my spirits with your adorable sweater bag!
Okay, I have to admit. I kind of threw a hissy fit when I saw this. I mean, how ingenious is that? A section of knit placed inside a pump turns it into a bootie. You're welcome!
Thrifty and Chic really did me in with a couple of her ideas. I love the idea of adding temporary winter textures to the home. Designing your home is like designing a brand, you want it to have a certain feel. And I love the feeling of a cozy home when it's chilly out.

Bring your spring cardi to winter by adding some knit to the end. Knitted bliss has a tutorial on how she knitted them together.
Snookums was recently given a nice sweater, but he doesn't wear sweaters. He's hot natured. Therefore, the logical conclusion would be for me to confiscate it and turn it into a sweater for me. Goodwill doesn't need it anyway, right?
Add some pom poms to your life. Seriously. Poofy things are life changing. I swear! There's a reason cheerleaders use them: they're just fun!
This makes me really tempted to splurge on a pair of galoshes. Embellish them with some knitting. 
Nothing wins me over like beautiful embroidery. And floral prints. I am unfamiliar with felting in this manner. I must learn!
This is on my to-do list. Hands down. It's on! I'm thinking of giving some of these sweater rugs as gifts this year too.
Such an original scarf.

Another great use for your kiddos old sweaters. Turn it into a softie for Christmas. 
Update your daughters winter wardrobe with your old sweater. 
Or give yourself a new chic skirt to pair with those tights

Happy inspiration!
Steph
Facebook        Twitter        Pinterest         Instagram        Email

Wednesday, November 6, 2013

Anthro hack: Rosette Pillow Shams

Now that we know how to use our ruffler foot, we're going to be making these darling pillow shams. 

Our inspiration
These Rosette Shams from Anthropologie. I fell in love with these and just knew I needed to make them. It gives that extra punch of femininity to my bed. I did consider painting polka dots on my fabric, but I have another pillow cover to make and that fabric has polka dots on it already, so I decided to keep mine a solid color. But if you want polka dots, by all means, paint some on with some fabric paint. Go hog wild! Have a blast!

You will need:
1.5 yards of fabric
Coordinating thread
Sewing machine
Standard presser foot
Ruffler foot
Scissors
Cut:  THESE DIMENSIONS ARE FOR A STANDARD SIZE PILLOW, 29" X 21".
Seam allowances are included with the measurements
Back of sham - 36 x 21.75 inches (cut 1)
Front middle section - 15.5 x 21.75 inches (cut 1)
Front ruched section - 7.25 x 42 inches (cut 2) 

With your presser foot properly in place, adjust the ratchet gear feed plate to 6 and your machine's stitch length to 3. Weave your fabric through the cloth guide and begin sewing ruffles down the width of all the ruche sections. It will automatically sew a 1/4" seam. (Check out the Sewing 101 series or the tutorial on how to use the ruffler foot if you need more information.)
Here's a better idea of what you should have when you're done. You will ruffle the width of both sides on each cut you made. The sections will shrink considerably, about 1.5 times their original size, to about the same 21.75" width of your other pieces. Press all of your seams and ruffles, allowing them to lay as they will. You can see some of mine are a little haphazard. That's what you want.
Replace your ruffler foot with your standard presser foot and adjust your stitch length to 2. Right sides together, sew each of the ruche sections to either side of the the middle section with a 3/8" seam. Serge or zigzag (use the smallest stitch length possible) the edge of the seam to finish it off. I'm sorry I don't have a better picture of each section going together. Essentially, you should have the front of your pillow sham fully assembled.
Using a longer stitch length (I use 4), press the seam to the right (toward the ruche section) and straight stitch it down 1/8" from your seam line. This will give your panels more of a profesh look!
Now that we're talking about this being all professional and what not, remember perfection is not necessary in this next step. Find the middle of your ruche section and sew a straight line all the way down. Repeat this step on either side of the middle line you just sewed. We are trying to tame that poofy look you get with such large ruffled pieces, while keeping that professional appeal about it. That's the great thing about shabby chic styles, chic style without the clean boring lines. After all, Perfection is Never an Option!
Cut your back piece vertically down the center. (Remember: it's longer in length than width; cut down the width.)
Pin one half to the left side of the front of your sham and sew it in place with a 3/8" seam allowance. Repeat on the right side with the other half of the back.
Press the seams and serge/zigzag each hem to finish them off. You should now have one really long strip of fabric. We're going to close that off soon and shape our sham.
Fold the edge of the right side of the sham 1/2" and press. Fold it again, press again, then sew 1/4" inch from the edge of the hem.
Repeat the previous steps on the left side of the sham, but fold and press this side 1".
Now let's create our cases. Fold the left back piece over, right sides of the sham facing. This side should fall several inches to the right of the center of the sham. Then fold the right side of the back of the sham over. (Be sure you fold each side along the outside seam of each ruched section. I accidentally folded on the inside seam of one and couldn't quite figure out for a bit why my sham wasn't laying right.)
Pin all the away across the top and bottom and sew the seams into place with a 3/8" seam. Be sure the one inch hem is on the inside and the one half inch hem is on the outside before you do. This makes a difference when you go to turn it. Clip your corners, turn it right side out, and you're done. You've created beautiful shams. For a fraction of the cost. Congratulations!
Happy sewing!
Steph  
Facebook        Twitter        Pinterest         Instagram        Email